Monday, December 25, 2017
Kenwood KA7300 - Stereo amplifier circuit diagram [Schematic]
Professional technician for all kind of electronic equipment. Doing since 1974.
Thursday, December 21, 2017
AIWA NSX-A777- S777 - A767 SCHEMATIC DIAGRAM
Professional technician for all kind of electronic equipment. Doing since 1974.
Tuesday, December 19, 2017
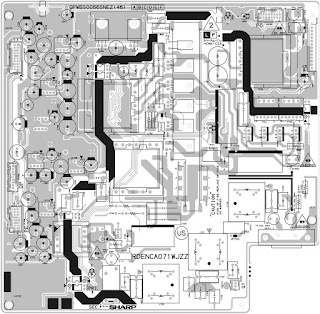
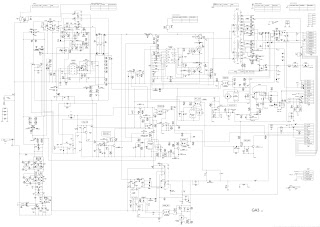
Sharp RDENCA071WJZ – SMPS schematic – Sharp LC26GD4U
Professional technician for all kind of electronic equipment. Doing since 1974.
Thursday, December 14, 2017
BN44-00304A - PSIV300402A Samsung LCD Monitor Circuit diagram
Professional technician for all kind of electronic equipment. Doing since 1974.
Sunday, December 10, 2017
Philips 06 AH 936/00/02/77 – Tuner-Amplifier-Record player-Tape recorder – Schematic
This is a very old model product from Philips, which is very rare and antique piece now. I'm not sure about the availability of spare parts now.
Used ICs: TDA1072, TDA1576, TDA1059, TDA1029, TEA5580, 1AA180, BD677 and BD678 (Output transistor pair)
Tuner, input selector, Main amplifier and Power supply schematic
Record player and Taper recorder section schematic
Click on the schematics to zoom in
Professional technician for all kind of electronic equipment. Doing since 1974.
Friday, December 1, 2017
Clarion NX700, Clarion NX700E - 2-DIN Memory Navigation & DVD Multimedia Station With 7-inch Touch Panel Control – Error codes, Adjustments and more ….
Professional technician for all kind of electronic equipment. Doing since 1974.
Clarion NX700, Clarion NX700E - 2-DIN Memory Navigation & DVD Multimedia Station With 7-inch Touch Panel Control – full schematic
NX700 (QY-5014B-A) (For North America: Region-1)
NX700E (QY-5015E-A) (For Europe: Region-2)
Before repair or inspection, make sure to follow:
Use specified parts.
The system uses parts with special safety features against fire and voltage. Use only parts with equivalent characteristics when replacing them.
The use of unspecified parts shall be regarded as remodeling for which we shall not be liable. The onus of product liability (PL) shall not be our responsibility in cases where an accident or failure is as a result of unspecified parts being used.
Place the parts and wiring back in their original positions after replacement or re-wiring.
For proper circuit construction, use of insulation tubes, bonding, gaps to PWB, etc, is involved. The wiring connection and routing to the PWB are specially planned using clamps to keep away from heated and high voltage parts. Ensure that they are placed back in their original positions after repair or inspection.
If extended damage is caused due to negligence during repair, the legal responsibility shall be with the repairing company.
Check for safety after repair.
Check that the screws, parts and wires are put back securely in their original position after repair. Ensure for safety reasons there is no possibility of secondary problems around the repaired spots.
If extended damage is caused due to negligence of repair, the legal responsibility shall be with the repairing company.
Caution in removal and making wiring connection to the parts for the automobile.
Disconnect the battery terminal after turning the ignition key off. If wrong wiring connections are made with the battery connected, a short circuit and/or fire may occur. If extensive damage is caused due to negligence of repair, the legal responsibility shall be with the repairing company.
Cautions in soldering
Please do not spread liquid flux in soldering. Please do not wash the soldering point after soldering.
Cautions in soldering for chip capacitors
Please solder the chip capacitors after pre-heating for replacement because they are very weak to heat. Please do not heat the chip capacitors with a soldering iron directly.
Cautions in handling for chip parts.
Do not reuse removed chips even when no abnormality is observed in their appearance. Always replace them with new ones. (The chip parts include resistors, capacitors, diodes, transistors, etc).
Please make an operation test after replacement.
Cautions in handling flexible PWB
Before working with a soldering iron, make sure that the iron tip temperature is around 270 . Take care not to apply the iron tip repeatedly (more than three times)to the same patterns. Also take care not to apply the tip with force.
Turn the unit OFF during disassembly and parts replacement. Recheck all work before you apply power to the unit.
Cautions in checking that the optical pickup lights up.
Cautions in checking that the optical pickup lights up.
The laser is focused on the disc reflection surface through the lens of the optical pickup. When checking that the laser optical diode lights up, keep your eyes more than 30cms away from the lens. Prolonged viewing of the laser within 30cms may damage your eyesight.
Cautions in handling the optical pickup
The laser diode of the optical pickup can be damaged by electrostatic charge caused by your clothes and body. Make sure to avoid electrostatic charges on your clothes or body, or discharge static electricity before handling the optical pickup.
Laser diode
The laser diode terminals are shorted for transportation in order to prevent electrostatic damage. After replacement, open the shorted circuit. When removing the pickup from the mechanism, short the terminals by soldering them to prevent this damage.
Actuator
The actuator has a powerful magnetic circuit. If a magnetic material is put close to it. Its characteristics will change. Ensure that no foreign substances enter through the ventilation slots in the cover.
Cleaning the lens
Dust on the optical lens affects performance.
To clean the lens, apply a small amount of isopropyl alcohol to lens paper and wipe the lens gently.
Schematic (Complete circuit diagram) - Click on the schematics to zoom in
Panel PWB
Main PWB
D/D PWB
Main PWB - Component & Solder side
Professional technician for all kind of electronic equipment. Doing since 1974.
Thursday, September 28, 2017
KDL37V4000 Sony LCD TV SMPS circuit diagram – 1-876-635-12-SE2AG
Professional technician for all kind of electronic equipment. Doing since 1974.
Sunday, September 24, 2017
TCL LCD27K76 and TCL 40E040 SMPS schematics
Professional technician for all kind of electronic equipment. Doing since 1974.
Friday, August 11, 2017
Orion TV29LB929 – 29 inch LCD/LED TV – how to enter service mode, adjustments, SMPS and backlight inverter schematic
Power supply and back-light inverter circuit diagram, service mode, Hotel mode, Reset, white balance adjustment – Orion TV29LB929 LED LCD TV - Used ICs in power and back-light inverter section circuit => MIP2M40MSSCF, FA5640N-C6-TE3, FMV09N90E(SMPS Switching FET), BD8779EFV-E2 (Backlight voltage control)
HOTEL MODE FUNCTIONTo set the Hotel mode, please follow the steps below.
1. Press the MENU ---> 1147 button on the remote control
2. Press the DOWN button on the remote control
3. Select the "Setup" menu , then press ENTER button
4. Select the "Hotel Mode" menu, Select "On".
5. The Hotel mode setting menu will appear
6. Using the UP/DOWN button on the remote control, select the desired mode. Then press the ENTER button.
7. Using the LEFT/RIGHT button on the remote control, set the mode to desired setting.
8. The Hotel mode has now been set up.
To
reset the Hotel mode, follow the steps below.
1. Press the MENU => 1147 button on the remote control.
2. Press the DOWN button on the remote control,
3. Select the "Setup" menu , then press ENTER button.
4. Select the "Hotel Mode" menu, Select "On".
5. The Hotel mode setting menu will appear.
6. Press the DOWN button on the remote control,
7. Select the Clear Lock menu "Clear Lock" menu then press ENTER button , then press ENTER button.
8. The setting items has now been returned to initial value
CHECK
FOR THE FIRMWARE VERSION
This
unit is provided with the following SERVICE MODES so you can repair, examine
and adjust easily
Do
not adjust after other items except "Version Info".
1. Check of the VERSION and SUM DATA on the screen.
1 : Press the MENU è 1147 button on the remote control.
2 : Press the DOWN button on the remote control,
3 : Select the "Setup" menu , then press ENTER button.
4 : Select the "Version Info" menu, then press ENTER button.
5 : On the screen as shown in Fig:
ADJUSTMENT PROCEDURE
On-Screen Display Adjustment
1. Press the MENU => 1147 button on the remote control.
2. Press the DOWN button on the remote control
3. Select the "Video" menu, then press ENTER button on the remote control.
4. Select the "Color Temperature" menu , then press ENTER button on the remote control.
5. On the screen as shown in Fig:
PRINTED
CIRCUIT BOARDS POWER (INSERTED PARTS)
SOLDER SIDE and POWER (CHIP MOUNTED PARTS)
SOLDER SIDE
SMPS and Back-light inverter board circuit diagram
WHITE
BALANCE adjustments.
1. Place the set in Aging Test for more than 15 minutes.
1. Place the set in Aging Test for more than 15 minutes.
2.
Please select input About mode to adjust W/B.
3. Receive the gray scale pattern from the Pattern Generator.
3. Receive the gray scale pattern from the Pattern Generator.
4.
Press the INPUT SELECT button on the remote control to set to the AV mode
5.
Using the remote control, set the brightness and contrast to normal position.
6.
Press the MENU è
1147 button on the remote control.
7.
Press the DOWN button on the remote control.
8.
Select the "Video" menu, and then press ENTER button on the remote
control
ENTER
button on the remote control ENTER button on the remote control.
10.
Press the UP/DOWN button on the remote control to select the "R
Gain", "G Gain", "B Gain", "R Offset",
"G Offset", "B Offset
11.
Adjust the LEFT/RIGHT button on the remote control to whiten the R Gain, G
Gain, B Gain, R Offset, G Offset B Offset at each step tone sections equally..
12.
Perform the above adjustments 10 and 11 until the white color is achieved.
Professional technician for all kind of electronic equipment. Doing since 1974.
Subscribe to:
Posts (Atom)


